Pages

Pages

Friday, January 27, 2017

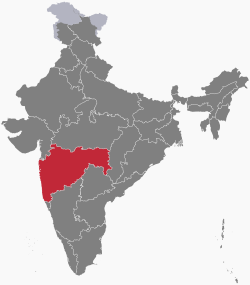
Where is Maharashtra, India?

So on Sunday afternoon I was just getting ready to embark on the next leg of my culinary travels, when there was a clap of thunder, followed by a lightening bolt, followed by a blackout. Well, I have actually been known to cook in the dark because I have a gas stove, but I wouldn't have been able to manage taking photos in the dark,so I elected to postpone my blog meal in favor of Chinese takeout. I can't say that I wasn't secretly a little grateful to have a night off.

Chatrapati Shivaji Terminus (CST), Mumbai, India.
Photo by sandeepachetan.
Anyway this was our week of student conferences, plus all the usual Kung Fu lessons, gymnastics classes etc., and then Martin tells me he's invited people over for roast beef on Saturday, and Sunday is my baby boy's seventh birthday ... so squeezing a blog meal in this week was a challenge. I did it, but not in time to get a recipe post online before next week. So for a start, I'll just tell you where we're going next, and you can look for the actual recipes after the weekend.

This week we're in Maharashtra, India, which based on the recipes Martin actually correctly guessed to be in central India. Leave it to a Brit to be able to pinpoint a whole region of India based entirely on the curry.

Anyway, Maharashtra is on the west side of India, bordering the Arabian Sea. It is the wealthiest state in India, contributing nearly one quarter of the nation's GDP and attracting migrants from all over India who come there in search of a higher standard of living. Its capitol is Mumbai, which is the most populous city in India and the ninth most populous urban agglomeration (which is the area encompassing both a city and the populated areas surrounding it) in the world. Mumbai is also home to the world's largest university (by number of graduates).

Maharashtra's cuisine can be mild or spicy, though the recipes I chose were notably on the spicy end of the spectrum. Most meals are served with rice and a flatbread such as chapati, and dal (lentils) are often served alongside. Of course, when I cooked my Maharashtrian meal I tried to cram it in on a weekday and I didn't have time to do dal ... and I also didn't have any rice, so it was lacking a bit in authenticity. Of course, I can't complain too much because it would have been a carb fest if I'd added both those elements, and you know I'm trying to stay away from carb fests because I love them and they're bad for me. But in case you want to do it more correctly than I did ... basmati rice and plain dal are easy accompaniments to help round out the meal.

As it was, I chose two recipes--a spicy chicken dish and a chapati stuffed with curried potatoes. It was tasty, but I had to make a no-heat version for my kids and a spicy version for us adults, so it was some extra work. It was good though, and I might make it again but would not be allowed to use drumstricks because my husband hates having to work for his food, haha.

See you in a few days.

Saturday, January 21, 2017

Recipes from Madagascar

So Madagascar was OK. I think it really just suffered from the whole "not enough resources online" problem that a lot of African countries tend to have. I found a scattering of options but nothing that really sounded thrilling, and a lot of it actually sounded like stuff I've already made for other countries.

The main dish I chose, for example, was a coconut chicken. It sounded good because I like coconut chicken--I've had both Indian and Thai versions of it and I'm fairly sure I've done at least one coconut chicken for this blog in the past. I really did want to find something a little bit different, something that wasn't so familiar, but I did not have any luck. So if you are from Madagascar, you know, drop me a comment with your favorite recipe. I am very sure that out there somewhere is a Malagasy recipe that I will find really wowing. It just wasn't this one.

So here you go, all three recipes. Before you eagerly jump into making that dessert, which I'm sure you won't based on the hideous photo, make sure you scroll down all the way so you can read my notes. :)

Malagasy Coconut Chicken.  A pretty basic chicken recipe made with coconut milk, garlic and ginger.

Kabaro au Carry (Curried Beans).  Lima beans cooked in a rich tomato sauce.

Malagasy Cake. Scrambled eggs and bananas. No, I'm not kidding.

Recipes from Madagascar - Coconut Chicken

So there was nothing wrong with this recipe. It was good--flavorful and easy to make. It just wasn't that different--I've already tried a lot of recipes for chicken in a coconut milk sauce. Most of them have some additional feature besides just coconut milk, like a curry paste or garam masala. This recipe was really just coconut milk. There was some garlic and ginger as well, but other than that it was a little plain.

Malagasy Coconut Chicken
Now, I will say that it's really unfair to criticize international recipes for being plain. Sometimes they are plain just based on necessity--not every country has ready access to spices or even standard ingredients we in the west take for granted, like salt. So there's really nothing wrong with "plain." I would have settled for "different," though. But I can't really complain because as blog recipes go, this one was pretty fast and easy to make. Here's how:

Instead of roasting or pan frying your chicken, you boil it. You just put the whole chicken in a pot of boiling water and cook it until a meat thermometer inserted into the thickest part of the thigh reads 175 degrees (note: it's safe to eat at 165, but I find the texture of dark meat to be not quite right until it gets to 175).

When the chicken is done cooking, knock the meat off the bones and set aside. Reserve 2 cups of broth.
Now grate the ginger and garlic:


In a large frying pan (you'll need a large pan because in a minute you're going to be adding a whole chicken to it), heat the oil over a medium flame and add the onions. Cook until translucent, then add the ginger and garlic. Keep cooking until fragrant (one or two minutes). 
Add the chicken to the pan, along with 1 to 2 cups of the chicken broth and the coconut milk. Let simmer for 30 to 40 minutes (you can add a little extra broth if the sauce is too thick). Serve over rice.
And here's the printable, pinnable version:


Ingredients

  • 1 whole chicken
  • 1-2 cups reserved chicken broth
  • 1-2 tbsp oil
  • 1 garlic clove, crushed
  • 1/4-1/2 cup ginger, grated
  • 1/4 cup onion, chopped
  • 1 15 oz can coconut milk

Instructions

  1. Fill up a big pot with water and add the whole chicken. Boil until a meat thermometer inserted in the thickest part of the thigh reads 175 degrees F.
  2. Remove the meat from the bones and reserve the broth.
  3. In a large frying pan, heat the oil over a medium flame and add the onions. Saute until the onions are translucent.
  4. Add the garlic and ginger and keep stirring until fragrant.
  5. Now add the chicken, 1 to 2 cups of the broth and the coconut milk. Simmer for between 30 and 40 minutes. You can add a little more broth if the sauce is too thick.
  6. Serve over rice.
Approximate time: . Serves 8.

Recipes from Madagascar - Kabaro au Carry (Curried Beans)

No matter how many times I've cooked dried beans, I never get used to the whole "you have to soak them first" thing. Or more accurately, I just never remember to do it.

Kabaro au Carry (Lima beans in tomato sauce)
Now, a few weeks ago I bought myself a new pressure cooker. You might remember that for a long time I was using my grandma's old pressure cooker, circa 1965, and there was that one time that it launched the little wobbly thing on top into the air like the space shuttle, which was mildly terrifying. And also those old pressure cookers sometimes explode, so yeah, it was time to get another one.

So anyway, when I bought my pressure cooker I was thinking, "Yay I don't have to soak beans anymore" (of course, it's not like I ever actually did soak beans ... but that's what I was thinking). But the cookbook that came with my pressure cooker was all, "You still have to soak the beans," and I was all, "What the what now?" So apparently buying the pressure cooker does not solve the whole bean soaking problem.

So I forgot to soak the beans, and then I tried to modify this recipe for the pressure cooker even though the beans were not pre-soaked, and although the whole thing wasn't a disaster or anything I'm not sure that the finished product was anywhere near what it would have been if I'd just followed the recipe.

So having said all that, here's the recipe, I'm going to tell you the proper way to do it and just pretend that that's how I did it.

So ideally, you want to rinse the beans and then soak them overnight. The next day, heat up the olive oil over a medium flame, then add the onion and cook until translucent.

Here's where I would normally add a picture, but I was too busy stressing out about the whole how-much-liquid-do-I-add-to-my-pressure-cooker-and-do-I-put-the-tomatoes-in-now-or-later thing and I forgot to take any.

Next, add the tomatoes and bring to a simmer. Cook for 10 minutes or so and then stir in the garlic and spices.

Drain the lima beans, and then add them to the pot with a fresh four cups of water. Bring to a boil, then reduce heat and simmer until the beans are tender (between 60 and 90 minutes). The sauce should be fairly thick, but add water if it gets a little clumpy.

Martin liked these more than I did. In the pressure cooker, the sauce cooked way down and I didn't actually think to add a little water to it, So it was almost like beans in straight tomato paste. Of course, Martin loves that really thick tomato flavor so he really liked them, but I found it overwhelming. Of course, I think it was my poor pressure cooker conversion that made the recipe turn out the way it did, so there's no way that can be a criticism. Anyway, here's the printable recipe:


Ingredients

  • 1 1/4 cup dried lima beans
  • 1 tbsp olive oil
  • 1 onion, chopped
  • 1 28 oz can crushed or diced tomatoes
  • 2 cloves garlic, minced
  • 2 tbsp curry powder
  • Pinch of cayenne pepper
  • Salt and freshly ground black pepper to taste
  • 4 cups water

Instructions

  1. Rinse the beans in cold water and soak overnight.
  2. Heat the olive oil over a medium flame, then add the onion and cook until translucent
  3. Add the tomatoes and bring to a simmer. Let cook for 10 minutes or so, then stir in the garlic and spices.
  4. Add the lima beans and water. Bring to a boil, then reduce heat and simmer until the beans are tender (between 60 and 90 minutes). The sauce should be fairly thick, but add water if it gets a little clumpy.
Approximate time: . Serves 6.

Recipes from Madagascar: Malagasy Cake

Banana flavored scrambled eggs, anyone? 

OK so clearly something went very, very wrong with this recipe. Because, check out the photo of this cake on this page:

Afro Tourism

If it looks like an omelette, that's because it's an omelette
Now check out the photo of my cake, to the left. Same ingredients, same instructions. But WTF?? This dessert was so awful my kids didn't even want to eat it. And I'm sure it was because something went wrong with my interpretation, I'm sure it isn't supposed to look/taste like it looked/tasted when I made it.

Looking around, there are some recipes for Malagasy cakes that call for cassava flour, so I'm wondering if maybe whoever transcribed the recipe accidentally left it out. Or maybe I just needed to mix it more, with an electric mixer or something? Though I'm not sure how that would have solved the texture problem. Because it was a texture problem, not necessarily a flavor problem. It needed something to give it body.

Now, I've made flourless cakes before and they've been fabulous, and they had a lot of egg in them too. So I'm feeling like if it really wasn't supposed to have flour in it, then the instructions were leaving out a critical step or just assuming that I know something I obviously don't know.

Anyway, I can't imagine you would actually want to make this after that less-than-glowing recommendation, but just in case you do, here's how:

First cut a slit in your vanilla pod. The recipe didn't actually say to do this, but it's what I've seen Food Network chefs do--otherwise all the flavor just stays inside the pod.

Now put the pod in the milk with the sugar, nutmeg and clove. Bring just to a boil, then remove from the heat.

Add the tapioca and return to the stove over low heat. Cook 10 minutes, stirring frequently.

Meanwhile, heat your oven to 350 degrees and butter a round cake pan.

Remove the vanilla pod from the milk and add the cream and mashed bananas.

Now add the eggs one at a time. I guess. Mix well and pour into the cake pan. Bake for 15 minutes or until a toothpick inserted in the center comes out clean.

Now, it said cook for 15 minutes, but it took more like an hour in my oven, which is why I think that this recipe must have been missing an ingredient. If it had flour in it I think it would have baked up a lot more quickly, just like any cake.

Anyway, it was awful. Not the flavor, the flavor was actually fine, like a really sweet banana bread. But the texture was like scrambled eggs, so it really wasn't very pleasant. Again, I'm sure the fault was mine, unless an ingredient got left out of the recipe--which does seem a little likely.


Ingredients

  • 2 cups milk
  • 1 vanilla pod, split
  • 4 tbsp granulated sugar
  • 1 pinch nutmeg, grated
  • 1 pinch clove, crushed
  • 5 tbsp tapioca
  • 2 tbsp cream
  • 4 ripe bananas, smashed
  • 1/2 oz butter
  • 4 eggs

Instructions

  1. Put the milk in a pot with the vanilla pod, sugar, nutmeg and clove. Bring just to a boil, then remove from heat.
  2. Add the tapioca and then put back on the stove over a low flame. Cook for 10 minutes, stirring frequently.
  3. Heat your oven to 350 degrees and butter a round cake pan.
  4. Remove the vanilla pod and add the cream. Stir in the bananas.
  5. Now add the eggs, one at a time, until everything is well mixed. Pour into the cake pan and bake for 15 minutes or until a toothpick inserted in the center comes out clean.
 Approximate time: . Serves 8.

Tuesday, January 17, 2017

Where is Madagascar?

This week we're in ... San Diego. White sandy beaches, cleverly simulated natural environment ... complete with fake rocks. No! We're in Madagascar. And if your kids didn't watch that movie on loop for like six months straight, you have no idea what I'm talking about.

Madagascar, as it turns out, is not anything like San Diego. Madagascar is actually an island off the south eastern coast of Africa, and a big one too, the fourth largest in the world, behind Greenland, New Guinea and Borneo (wherever that is). If you've ever seen Madagascar (because everyone knows that kids' movies don't lie), you know that it's teeming with exotic animals like lemurs and fossa, the latter of which are in fact a real thing and I know because I was once shocked to see a bunch of them on exhibit at ... wait for it ... the San Diego Zoo. Fossa are kind of weird looking cat-dog-mongoose type things found nowhere else in the world, just like a stunning 90% of Malagasy wildlife. The reason for all this biodiversity has to do with the isolation of the island--it split from mainland India 88 million years ago, which gave native species a chance to evolve into really unique creatures.

Of course as interesting as this is, it doesn't have a whole lot to do with food ... unless you think we'll be eating a nice fossa stew with lemur ice cream for dessert. Malagasy cuisine is actually not as exotic as its wildlife is--most meals comprise of rice as a base served with an accompaniment that can be either meat or vegetables. Because hunting by early settlers basically wiped out the island's megafauna, most staple meat is pretty typical poultry and beef, which admittedly makes my job a lot easier.

The standard Malagasy meal is called Vary sy laoka, which loosely translated means rice and whatever we happen to be serving with it today. I picked two dishes for my meal--a chicken and coconut laoka with some Lima beans cooked in a tomato sauce on the side. And there was a dessert, too, though honestly I'm really trying to block that out. :) Check back in a couple of days for the details.


Friday, January 13, 2017

Recipes from Macedonia

So I spent the first half of my week on this "cleanse" diet where I was literally living off of baby carrots and protein shakes. I used to laugh at people who did that sort of thing. But dammit, I really wanted all that extra Christmas cookie weight to go away. By the end of the third day I was worried I was going to sleepwalk to the fridge and eat a whole pint of ice cream, but sense prevailed (or possibly the total absence of sense, depending on how you feel about this sort of thing). Anyway I got through it, it worked, and I am now capable of rationally discussing food without bursting into anguished tears of dismay.

I'm glad that Macedonia was my re-introduction to my blog-life, because it was a fairly simple meal, it tasted good and it didn't take me all day to prepare. I picked three recipes:
Selsko Meso is a traditional pork and beef dish with tomatoes and cream.
Pogacha with White Cheese.  These are kind of like dinner rolls only with feta cheese baked into them.
Bombici. These are chocolate truffles made with cocoa powder, crushed cookies and a splash of rum.

So you may have noticed I'm organizing things a little differently starting today, because I want my blog to be a lot more Pinterest- and search engine-friendly than it's been in the past. I know, it's a really boring reason to reorganize everything, but hey, I want more readers. So the first thing I'm doing is putting all the actual recipes and related info on their own individual pages, which should make Google happier, but will hopefully also make for a faster read and a less confusing layout.

So. The links above will take you to each of the three recipes, with some details about all the drama involved in creating them. Enjoy!
 
Next time: Madagascar (I like to move it move it!!)

Recipes from Macedonia - Selsko Meso

Selsko Meso is one of those multi-meat dishes that we really don't do very often here in the US. It's pork, but it's also beef. It's chunks of meat, but it's also meatballs. And beef jerky. I know.

So when you're making this stuff, you do the meatballs first. In this version of the recipe (though it's always hard to tell because sometimes the translation is a little head-scratchy) you're supposed to put a little chunk of onion inside each meatball, which is a fun little surprise for the people eating it (especially my kids, evil laugh). Here's a photo of the onion-insertion process, which evidently is complicated enough to require a visual:
After you make the meatballs, put the rest of the onion into a food processor and turn it into a paste. Now fry up the pork until it starts to brown a little, and add the onion.

The recipe I was following said to use either tomatoes or ketchup, and come on, ketchup? I don't even use that with French fries. So I of course chose the tomatoes, but I made them kind of ketchupy by grinding them up like the onions. Then I added them to the pot with the mushrooms and the meatballs ...

... and ....
The beef jerky!! Now, you will see based on the recipe below, that it didn't actually specifically say "beef jerky," it said "smoked, dried meat." Which is beef jerky, right? But they probably don't call it that in Macedonia. Anyway, I just went out on a limb and interpreted it as the stuff I can easily find in any grocery store, although I admit to not using as much beef jerky as the recipe called for, because dang, beef jerky is expensive.

Anyway, then mix in an unspecified amount of salt, pepper and paprika. Mix together the flour and water and add that, then dump in a glass of white wine.

Traditionally, this stuff is made in a clay pot, so you know, if you have one you would be transferring everything to the pot at this point and baking it in the oven at 350 degrees for 20 minutes or so, or until it's bubbly. The mixture is really already cooked, so at this point you're just waiting for the flavors to incorporate.

Take it out of the oven and add the cream and feta cheese to taste.

Predictably, Martin and I liked the Selsko Meso. Thanks to the cream it was rich but not over-rich--still a bit much for me personally given how little cream I consume these days. My kids were like, "Mmm this is good," but then they didn't eat any of it. Their logic, of course, was that in making me believe they ate some of their dinner I would then be compelled to make sure they got dessert. Ha! Well, they did get dessert but it isn't because they fooled me into thinking that they ate their dinner.

And now for the recipe, in glorious readable, printable form:


Selsko Meso

from Macedonia Online

 
Selsko Meso: Meat stew with cream and tomatoes

Ingredients:

  • 10.5 oz ground beef
  • 1 onion
  • 2.2 lbs pork, cut into 1-inch pieces
  • 1 tbsp olive oil
  • 2 medium tomatoes (or ketchup)
  • 24.5 oz mushrooms
  • 10.5 oz dry smoked meat, cut into small pieces
  • Salt, pepper and paprika to taste
  • 1 tbsp flour
  • 1 cup water
  • 1 glass of white wine
  • Feta cheese
  • Cream

Instructions

  1. Cut part of the onion up into thumbnail-sized pieces. Make small meatballs with the ground beef, placing a piece of onion inside each one.
  2. Put the remaining onion into a food processor and grind into a paste.
  3. Heat the oil over a medium flame, then add the pork. Fry until it starts to brown.
  4. Add the ground onion and stir until translucent. Now add the tomatoes, the mushrooms, the smoked meat and the meatballs.
  5. Season with the salt, pepper and paprika.
  6. Dissolve the flour into the water, then add it to the pot. Add the glass of wine, then transfer the mixture into an oven-safe dish (this is traditionally a clay pot).
  7. Bake at 350 degrees for 20 to 30 minutes. The mixture is really already cooked, so at this point you're just waiting for the flavors to incorporate.
  8. Add cream and feta cheese to taste.
Approximate time: . Serves 8.

Recipes from Macedonia - Pogacha with White Cheese (Breadrolls baked with feta)

Bread is one of my favorite things to make, especially when I can hide cheese in it. Of course I'm never exactly sure if I'm pairing all of this stuff correctly, but to me these cheesy rolls seemed like a good fit with the creamy Selsko Meso. And they're easy to make, especially if you cheat and let your bread machine do the kneading for you.

So this recipe starts out like no other bread recipe I've tried--you proof the yeast in yogurt instead of just sugar water. I figured the yogurt should probably be room temperature for this, so I left it out of the fridge for an hour and then mixed in the yeast. I really didn't see anything happen in the few minutes I left it out, although the dough certainly did rise.

Now add the eggs, oil, flour and salt. The dough should be soft and pliable, not sticky, so don't worry if you have to add a little more flour. Knead (yay bread machine) and let rest for 15 minutes.
Roll the dough out on a floured surface into a roughly rectangular shape, then brush with melted butter. Sprinkle the cheese over and then roll the whole thing up lengthwise like a jelly roll.
Cut the roll up into pieces the size of dinner rolls (coz that's what you're making).

Place in a baking tray and let rise until roughly doubled. Then brush the top with beaten eggs and sprinkle sesame seeds over.
Bake at 400 degrees for 20 minutes, then reduce the temperature to 350 degrees and continue to bake until lightly browned.

So this bread was actually kind of hilarious, not the recipe itself but my family's reaction to it. My daughter gobbled it down with much enthusiasm and declared, "You should make this once a week!" And then my son, who apparently hates me, chimed in "But it has cheese in it!" At which point my daughter's expression changed from delight to disgust and then she threw the rest of her pogacha in the trash.

Actually that's more depressing than it is hilarious. But anyway, the rest of us really liked these things. They were an unusual twist on a traditional dinner roll, and the yogurt made them really moist and delicious.

Here's the recipe:


Pogacha with White Cheese

from Macedonian Cuisine

Pogacha with White Cheese: Breadrolls baked with feta

Ingredients:

  • 1 cup Greek yogurt
  • 2 tsp instant dry yeast
  • 1/2 tsp sugar
  • 2 eggs
  • 3/8 cup oil
  • 3 1/3 cups flour
  • 1/2 tsp salt
  • 1/2 stick butter
  • 3.5 oz feta cheese
  • 1 egg, beaten
  • Sesame seeds

Instructions

  1. First bring yogurt to room temperature. Add the yeast and sugar and mix together. Leave for a few minutes to give the yeast time to become active.
  2. Gradually add the eggs, oil, flour and salt. If the dough is too sticky, add a little more flour.
  3. Knead, then let rest for 15 minutes or so.
  4. Turn the dough out on a floured surface and roll to a roughly rectangular shape. Coat with melted butter, then sprinkle the feta cheese over.
  5. Roll the dough up jelly-roll style, then cut into dinner roll-sized pieces.
  6. Butter a casserole dish and transfer the rolls to the dish. Let rise for an hour, or until rolls have doubled in size.
  7. Brush the tops of the rolls with the beaten egg and sprinkle with sesame seeds.
  8. Bake at 400 degrees for 20 minutes, then reduce temperature to 350 degrees and continue to bake until lightly browned.
Approximate time: . Serves 8.


Recipes from Macedonia - Bombici

And finally ... dessert! Now, I'm not really supposed to have dessert, at least not every week, but these were perfect because they were small and didn't really amount to much in the way of calories. If I'd only eaten one, I suppose. In my defense though, I stopped at two but it was hard, they were pretty yummy. Here's how you make them:


Bring some milk to boil with butter, sugar and cocoa powder, then remove from heat.

Crush some digestive biscuits into fine powder, then add to the milk. Stir, then add a splash of rum.
Now let the mixture cool, then put it in the freezer until it becomes firm (about 45 minutes). Take it out, and roll it up into little truffle-sized balls, then put them back in the fridge to chill.
Then, melt some chocolate and dip each ball, dust with cocoa and let the chocolate harden.

Before I tell you exactly what we all thought, I just want to throw in a quick note: "Digestive biscuits" was a name that once horrified me, I mean what? Who names a food after a bodily function? That does not sound delicious. Doesn't your brain just want to finish the phrase with the word "juices" or something? Blech. But "digestive biscuits" are really just animal crackers without the animal shape. You can usually get them in the British foods section, though the Hispanic foods section probably also has a version.

Anyway, everyone in my family ate one rum ball, and then two. I put the last 12 of them in the fridge because I told everyone I wanted to get better pictures of them, and then I proceeded to forget to take pictures for four days and everyone lost their minds. Evidently not letting them eat the rum balls was like the worst thing I could ever do as a parent. So yeah, they were a hit.

Here's the recipe:


Bombici (Rum Chocolate Truffles)

from Tasty Mediterranean

 
Bombici (Rum Chocolate Truffles)

Ingredients

  • 1/2 cup milk
  • 1 stick butter
  • 1 cup sugar
  • 1 tbsp cocoa powder (plus a little more for garnishing)
  • 5 oz digestive biscuits, finely crushed
  • 3 tbs rum (optional)
  • 3.5 oz chocolate chips

Instructions

  1. Bring the milk to a boil with the butter, sugar and cocoa powder. Once boiling, remove from the heat.
  2. Add the crushed biscuits to the milk and stir, then add the rum.
  3. Let cool, then transfer to your freezer for around 45 minutes, or until firm enough to handle.
  4. Roll the mixture into truffle-sized balls. Put the balls into the fridge for another 20 minutes.
  5. Now re-roll all the balls until they have a smooth surface. Return to the fridge for 10 minutes. Endure the impatient whines of your children.
  6. Heat the chocolate on the stove or in your microwave until it melts. When the chocolate is nice and liquidy, dip the truffles in it and return them to the plate.
  7. Dust with cocoa powder, then let harden. Endure more impatient whining.
  8. Serve!
Approximate time: . Makes 24 truffles.


Tuesday, January 10, 2017

Where is Macedonia?

OK, so on Sunday I cooked a meal from Macedonia. I didn't feel like getting my lights down, so my photos all suck, but I did cook the meal (yay).

Actually this is the second time I've cooked a meal from Macedonia, but the last time was like two years ago and I honestly couldn't tell you a thing about it. In fact when I look at the recipes I made last time, I'm like, "Hmm, I have no memory of ever making that." So that must mean it just wasn't very memorable. Which is why I chose completely different recipes this time around.

Stone bridge in Skopje, Macedonia. Photo by Mariusz Kluzniak.
I'm doing this in bite-sized portions, (I don't mean the food itself, I mean the blog), which I hope will keep it more manageable. So for this post, I'm just going to tell you a little bit about Macedonia. Recipes will follow later in the week.

Macedonia is in Southern Europe. It borders Albania, Greece and Bulgaria, with Kosovo and Serbia to the north. If you really haven’t heard much about Macedonia, there’s a good reason—until 1991 it existed only as a part of the former Yugoslavia. Macedonia is a member of the United Nations, but because of some whine-fest between it and Greece over who has the right to actually use the word “Macedonia,” the UN calls it “The Former Yogoslav Republic of Macedonia,” instead of just “Macedonia,” which must be really annoying to whomever has to keep typing its name into the official documents.

Macedonia is beautiful—its terrain consists mostly of mountains, valleys and rivers—but it’s also one of the poorest European countries. In 2015 the unemployment rate was 27.3%, which sounds awful until you hear that that number is actually significantly down from where it was in 2005 (37.2%). Today, seventy-two percent of Macedonians say they can manage to survive on their income only with “difficulty” or “great difficulty,” even though nationally things like GDP, foreign trade and economic growth make it look pretty good on paper.

The Macedonian climate is warm, so the conditions are good for growing fruits and vegetables, which means that the cuisine is pretty diverse. It’s been influenced by Macedonia’s Mediterranean and Middle Eastern neighbors like Greece and Turkey, so the food has got some flavor, which is always a plus.

On a totally separate note, I got a request from one of my three readers (haha) to post one or two of my favorite healthy recipes, so I’m going to append one of those to the end of this post, even though it has absolutely nothing to do with Macedonia. So here’s healthy recipe the first. How is this Travel by Stove? Well, it hails from somewhere in exotic El Segundo, CA, which is where Clean Eating Magazine is published. It actually took me way too long to find their location on their dumb website, so I hope you at least chuckled.

Chicken Burgers with Basil Yogurt Sauce
From Clean Eating Magazine

For the sauce:
  • 1/4 cup whole-milk plain yogurt 
  • 1/4 cup chopped fresh basil 
  • 2 tsp Dijon mustard 
  • 1 tsp fresh lemon juice 
  • 1 tsp raw honey 
  • 1/8 tsp each sea salt and ground 
black pepper
For the burgers:
  • 1½ lb ground chicken or turkey 
  • 1/4 cup finely diced baby cucumber 
  • 1/4 cup finely diced red onion 
  • 1 tbsp chopped fresh dill 
  • 2 tbsp whole-milk plain yogurt 
  • 2 tsp Dijon mustard 
  • 1/8 tsp each sea salt and ground 
black pepper 
  • 4 slices (1/2 oz each) Havarti cheese
  • 4 slices whole-grain baguette (sliced diagonally) 
  • 4 small leaves red leaf lettuce 
  • 1 Roma tomato, sliced 
  • 1/4 cup diced avocado 
Directions:

First combine the sauce ingredients in a small bowl, then set aside.

Now preheat your grill to medium high and brush with oil (I just used a grill pan on my stove, and they turned out awesome).

Mix the ground chicken with the cucumber, onion, yogurt, dill, Dijon mustard and salt and pepper. Shape the mixture into four patties and grill on both sides until they reach an internal temperature of 165 degrees. A couple of minutes before they're done, top each patty with a slice of cheese and toast the baguette slices.

Serve the patties on the toasted baguette slices and top with tomato, avocado and yogurt basil sauce.

And just as an aside, the key to eating healthy is to limit (but not eliminate) carbs and fat. If you're going to eat carbs, eat whole grain everything. Have some cheese and avocado but don't overdo it. And substitute Greek yogurt for everything (mayo, sour cream, salad dressing ...).

Macedonian recipes will land here in a few days. See you then!

Monday, January 2, 2017

New Year's Resolutions and Stuff

Hello.

Surprised to see me here? I kind of am, too. I'm not even going to look at the date of my last post because it's been a long, long, time. And it's no coincidence that my first post in months (or is it years??) is in the first week of January because yes, it's one of my New Year's resolutions to get back to blogging. And I know what you're thinking, you're thinking, "Haha, EVERYONE makes New Year's resolutions and most people break them by January 2nd." Well, I'm here to say that it's January 2nd, and I haven't broken my resolution yet! Haha. Of course I might break it by January 3rd, but I'm really going to try hard not to.

So here's what I've been doing. I left 53 pounds of myself back in 2016, unless you count the two pounds I gained over the holidays but I'm trying not to. So I went from a size 16 to a size 6 in 8 months, and I have to say that I've tried about a million different diets and never actually found one that I could stick with until I reached my goal, so I'm feeling a pretty big sense of accomplishment. And even though this is not and never will be a diet and healthy eating blog, you know, if you want to know how I did it I'm happy to share.

But that's enough about that. There was also Disneyland, camping, obtaining a cat, the kids' endless school and after school activities, work, sleep and all that other stuff that people do. Oh and also I don't look hideous in a bathing suit anymore. But despite the crazy business of my life I really have to start making time for this blog. It's cathartic. It's a goal that I still haven't achieved. It's fun, and I've really missed it.

So the real question I've had to ask myself is how I can do the blog and still maintain my general good health (I mean, not gain back a bunch of weight from all those blog-related calories). And I've thought about that a lot. A lot of traditional food, after all, is high fat, high calorie. And I don't want to change this blog so that it's "Travel by Stove, but only if it's clean eating, low calorie and limited carbs." because that would be lame. So ...

I'm going to post at least weekly, but not every post will be a recipe post. I'm going to do some book reviews and some product reviews, I'll talk about culinary tradition and hope I can do all of that in an interesting way. And when I choose recipes, I'll favor healthier ones but only if they are truly representative of the culture. And I'll eat small portions.

So there you have it. My next blog meal is scheduled for Sunday, so you can look for a recipe post by the middle of next week. No, really. I hope.