Recipes from Marche, Italy

For this entry, I made two recipes. Neither of them were especially good, but I don't blame the people who posted the original recipes or any of the traditions they came from, I blame myself and my propensity for Googling things that might kill me.

Recipes from Marche, Italy: Brodetto

A seafood stew with mussels and clams, minus the Vibrio.

Recipes from Marche, Italy: Filone Casereccio

An Italian bread that will come out much better than mine did if you use fresh brewer's yeast and steam.

Recipes from Malta

This is actually the third time I’ve cooked a meal from Malta. The first time, I cooked the meal and then just did not write the blog post. Years went by.

Recipes from Malta: Imqarrun

Imquarrum (also called Imqarrun il-forn) is descended from a dish served in Sicily, but the Maltese have adopted it as a traditional staple. The key to making this dish is to be patient.

Thursday, January 26, 2012

Recipes from Bahrain

This week we're headed to another island nation, but this time it's not in the Caribbean, which is good, because as you know I really need a break from all the coconut. The nation we're visiting this week is Bahrain, which is a small island state in the Persian Gulf.

The big white area is the Persian Gulf.

The nation of Bahrain includes 33 different islands, the largest of which bears the same name as the country itself. The total number of people living in Bahrain is somewhere in the region of 1,200,000, which population-wise makes it roughly the size of Dallas, Texas. I'm sure it won't surprise you to hear that Bahrain is known for its oil production, which puts it squarely into the stereotype most Americans have for the Persian Gulf. Before it had an oil based economy, though, it was known for its pearl industry. The waters near Bahrain are (or once were?) full of oysters bearing natural pearls, which were considered by many to be some of the best and the world and were traditionally collected by "breath-hold" divers.

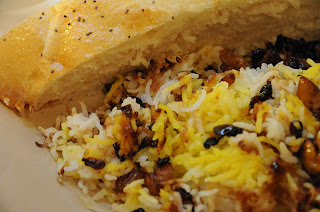
Because Bahrain is a small nation, there isn't exactly a plethora of websites out there devoted to Bahraini cuisine. I'm sure Bahrain, like all countries, has a long and rich culinary tradition but I'll be damned if I could find anything written about it. Pretty much everyone who mentions classic Bahraini cuisine presents just one recipe: machbous al djaj (spiced chicken with rice).

Machbous ala Djaj with Khubz

Here are the ingredients:
(from The Internet Nations)
  • 2 large onions, chopped
  • 2 tablespoons ghee or butter
  • 1 tablespoon baharat
  • 1 teaspoon turmeric
  • 1 3 or 4 lb chicken
  • 1 1/2 cups chopped tomatoes
  • 3 cloves
  • 1 strip lemon rind
  • 2 cinnamon sticks
  • 6 cardamom pods
  • 2 tsp salt
  • 2 1/2 cups water
  • 2 cups basmati rice
  • 2 tbsp chopped fresh cilantro
  • 2 tbsp chopped parsley
 So that's what I made, because I was quite frankly tired of looking around for other options. There are a scant few of them out there, but I figured there had to be a pretty good reason why machbous was coming out on top as the Bahraini favorite.

A quick ingredient note: I got baharat, a spice mix, from Amazon.com for about five bucks. I elected not to try making it because the first recipe I found called for "cassia bark," and you know, huh? So I decided I'd really rather just buy the stuff ready made, rather than try to track down some cassia bark, thus adding another level of complication more than I would have if I just ordered the baharat. Of course when the baharat arrived there was no mention on the label of any "cassia bark," and I've since seen several recipes that don't call for it so I guess I wasted some money in order to save myself the 10 minutes I would have spent just making the stuff myself. So if you'd like to make it instead of buy it, you can get a cassia-free version from my good friends at Food.com.


Here's the baharat I bought on Amazon.com for five bucks. Whatta sucka I am.

For my next recipe, I found a mention on Wikipedia of a pita bread eaten in Bahrain known as "khubz." After digging pretty deeply I found a recipe for it (from The Rhubarb Fool):

  • 2 1/2 tsp dry active yeast
  • 1 1/4 cup lukewarm water
  • A pinch of sugar
  • 3 3/4 cup bread flour
  • 1/2 tsp salt
  • 2 tbsp vegetable oil
It's actually very, very similar to the recipe I use for naan bread (which like the recipe I did for Azerbaijani Tendir Choreyi falls just that little bit short of being authentic because it isn't cooked in a clay oven).

I almost stopped there (I've got Henry's second birthday party coming up so I figured I could use a little bit of a break), but then I found a recipe for Bahraini-style baba ghanoush, which is also popular in Lebanon, Egypt and Turkey (from Recipes Wiki):

  • 1 large eggplant
  • 2 cloves garlic
  • 2 tbsp sesame tahini
  • ¼ tsp salt
  • 1 tbsp fresh lemon juice
  • 1/2 cup yogurt
  • 3 tbsp olive oil
  • 5 kalamata olives
It looked pretty simple, so I figured I'd throw it together in the afternoon and devote the evening to the other two dishes.

In Bahrain, baba ghanoush is usually eaten as a dip with sliced kuhbz (in Egypt they eat it as a salad or a side dish). To make it, just take a large eggplant and put it on a baking sheet, then stick it in a 400 degree oven for about an hour (I turned mine over about 30 minutes through, but the recipe didn't say that was something you needed to do). When the hour is up, take the eggplant out and let it cool, then remove the skin and the green top and put the soft insides into a blender.

After an hour in the oven the skin comes right off.

Add the rest of the ingredients and pulse until smooth. Garnish with the kalamata olives. That's it! Easy-peasy.

Baba ghanoush. Yes, I forgot the olives, which was annoying because kalamata olives cost like $5.99 a jar.

The khubz is pretty easy too, until you get the part where you have to put it in the oven. As always, I'm going to give you the manual instructions, even though I just put mine into my bread machine.

Dissolve the yeast and the sugar in about a half cup of the lukewarm water. Let stand until frothy.

Sift the flour together with the salt and add the yeast mixture. Knead by hand until the dough is soft, adding water as necessary. Add the oil and keep kneading until the dough becomes elastic and is no longer sticky, which should take about 15 minutes.

Here's the dough as it appeared in my bread machine.

Now form the dough into a ball and rub all over with a little bit of olive oil, to prevent it from drying out. Cover with a damp cloth and let rise in a warm place until the dough has doubled in size, about 1 to 1 1/2 hours.

Punch down and knead for another five minutes or so. Now break the dough into tennis-ball sized portions. Turn out onto a lightly floured surface and roll flat, until each ball is about a quarter inch thick. Dust with flour and transfer to a lightly floured surface, leaving a few inches between each one to allow for rising. Let rise for another 30 to 60 minutes.

About halfway through the second rise.

Now for the tricky bit:

Oil two large baking sheets. Preheat your oven to 500 degrees. About 10 minutes into the preheating, put the sheets in the oven. Leave them there for another 10 minutes.

Now open your oven and quickly transfer the dough balls onto the baking sheets. Close the oven and go press the "hush" button on your smoke alarms.

Bake for 6 to 10 minutes. When the breads are lightly browned, take them out. Now go hush your smoke alarms again. Let the bread cool.

If you did this right, each bread should be puffy with a little pouch inside. I did not do it right, apparently, since mine came out light and airy inside but with no pouch. Still pretty danged tasty though and went well with the baba ghanoush.

No pockets but still tasted very good.

Now on to the machbous. Start by melting the ghee (you can also use butter, ghee is just a clarified version) in a saucepan and frying the onions until they are transparent and beginning to turn brown. Add the baharat and turmeric and stir for another two minutes or so.

Saute some onions. Ho, hum.

 Now add the chicken pieces to the pot and turn to coat. Cook over a medium heat until the pieces are lightly browned on all sides.

This is where it all starts to smell really good ...

Then add the tomatoes, cloves, lemon rind, cinnamon, cardamom pods and salt. Stir to get everything well incorporated, then add the water. Bring to a boil, then reduce heat and cover. Simmer for about 45 minutes.

Add the water and simmer for about 45 minutes.

Wash the rice in cold water and drain (this helps remove the starch and makes for a fluffier finished product). Add the rice, cilantro and parsley to the pot and bring back to a simmer. (You can also wait until just before serving to add the cilantro and parsley, which is what I did. 'Cause you know, I like my herbs to taste fresh. Or maybe it was because I forgot to put them in until just before serving).

Keep cooking for another 35 to 40 minutes, until chicken is tender and almost all of the liquid has been absorbed. Remove from the heat and let rest for 10 minutes.

Now, my kids don't like rice because they were spliced with alien genes in utero or something. So although I thought the rice was the best part of this meal, their plates all still had rice on them when everyone left the table. The chicken did go down pretty well, though I thought the white meat was way too dry. But I find that to be the problem whenever I try to stew white meat--even white meat that is swimming in liquid always seems to come out dry unless it's removed at the precise moment it reaches 165 degrees.

We liked the bread, too, even though it wasn't the pocket-pita it was supposed to be. I thought it tasted great with the baba ghanoush, which was really very similar to hummus (with eggplant instead of chickpeas) but of course my kids wouldn't go near that wierd brownish gray substance I put in a bowl on the table. Poor Martin didn't think much of the baba ghanoush, because I didn't give him any, because I'd forgotten all about it by the time he got home from his late night at work. Oh well.

Next week: Bangladesh

For printable versions of this week's recipes:

Thursday, January 19, 2012

Recipes from the Bahamas

First a bit of blog news: if you're just joining me on my weird little gastronomical journey around the world, I'm in the process of archiving all the recipes I've done so far offsite in a much more printer-friendly format than you'll find in any individual blog entry. To view the list (and all the countries I'll be doing in the future), click on "The List" on the left hand side of this page, under the header "Pages." From there you can link to each of the individual recipes from past weeks. I hope to also add lists that organize the recipes by course and type (meat, fish, vegetarian etc.), so keep an eye out for that too.

Now on to the usual business: the Bahamas. Despite this being yet another Caribbean nation, I actually enjoyed the whole process of putting together this week's meal, which was both tasty and unusual.

Johnny cakes with crab 'n rice. I don't know if this is a traditional combination, but it worked for me!


But first a bit of history.

Considering the fact that it is a tropical paradise, the sovereign nation known as "The Bahamas" actually has a pretty dark early history. It was the site of Columbus' first landing in the Americas, which was bad news for the native Lucayans, who by 1513 had all been shipped off into slavery. The Bahamas remained mostly unpopulated for the 135 years that followed, until English colonists began settling there in 1648.


There's the Bahamas, just off the coast of Florida.

After the Amercian Revolutionary War, pro-British loyalists who had formerly lived in the US began moving to the Bahamas, bringing African slaves with them so they could set up a plantation economy. Not long afterwards the British abolished the slave trade and began resettling freed African slaves in the Bahamas. Today the descendents of freed slaves comprise about 85% of the population, which means that Bahamian cuisine has a strong African influence, shaped of course by the tropical foods that are readily available on the islands.

So I decided to start my psuedo-trip to the Bahamas as a tourist would, with conch fritters, which I'm told are something of a requirement on the menu of every restaurant on the Bahamian islands. When I was a kid we had a conch shell (pronounced "konk") sitting on our patio, so it's kind of a childhood memory thing for me although I can't really say I ever thought about what it might be like to eat one. In case you've never seen a conch shell:

This is a conch shell, just like the one we had on our patio when I was a kid.


They are beautiful, big, and unsurprisingly difficult to find in a California supermarket. I did, however, locate a canned version on Amazon.com. I ended up spending $20 on four cans. Yes, I really wanted to try eating conch. Of course now I'm stuck with two extra cans I have no idea what to do with. Maybe I can find a conch recipe that includes dulce de leche, which I also have an extra five cans of. Haha.

Here's the recipe for conch fritters (from AllRecipes):

For the fritters:
  • 1 ½ - 2 lbs, conch meat, ground
  • ½ green bell pepper, diced fine
  • ½ red bell pepper, diced fine
  • ½ yellow bell pepper, diced fine
  • ½ white onion, diced fine
  • 1 celery rib, finely sliced
  • 1 teaspoon jalapeño chile, minced
  • 1 tablespoon chopped fresh cilantro
  • 1 tablespoon dried thyme
  • 3 cups all purpose flour
  • 1/2 tsp Jamaican jerk seasoning
  • Water
  • Vegetable oil for frying
For the dipping sauce:
  • 1/2 cup ketchup
  • 1/2 cup lime juice
  • 1/4 cup mayonnaise

Note: this recipe makes about 30 fritters, so as an appetizer if you made the whole recipe you'd be able to feed between 10 and 15 people. I actually did about 1/6th of the recipe, which given my third grade math skills was not easy, and it was still too much for me and Martin.

The second recipe I hit on is also very popular in the Bahamas, though it sounds like it might be a bit less touristy and a bit more traditional than the conch fritters. Here it is:

Crab 'n Rice
(from The Bahamas Islands)
  • 3 tbsp oil
  • 1 onion, chopped
  • 1 red bell pepper, chopped
  • 5 tbsp tomato paste
  • salt and pepper to taste
  • 1/2 tsp thyme
  • 1 tsp paprika
  • 4 cups water (traditional) or crab stock (my tweak)
  • 2 cups long grain rice
  • 2 cups canned or soaked pigeon peas
  • 4 whole crabs

Now the thing about crab 'n rice, as prepared in the Bahamas, it's usually made with land crabs rather than sea crabs. If you don't know what a land crab is, prepare to be horrified:


Hey, isn't that the thing that tried to eat Frodo?

OK, actually that is a coconut crab, which is a kind of land crab that doesn't live in the Bahamas. I just wanted to freak you out. This image kind of went viral a couple of years ago so it's all over the internet and I have no idea who to credit for it. I wish I did, because I would ask that person where the hell he/she got a lens long enough to take that photo, because I wouldn't personally get within about three or four miles of that thing.

Actually the land crab you will find in Bahamian Crab 'n Rice is more like this one:


A Bahamian land crab is a little less scary.

Which only grows up to just over a foot in size, which is still actually pretty damned big, and I wouldn't really want to see one of those climbing into my trash either. Anyway you can't get land crabs of any kind at my local Safeway, so I just used regular run-of-the mill crabs, of a variety I can't actually recall at the moment. I'm pretty sure any kind will do since I'm told that land crabs taste pretty much exactly like the ones that come out of the ocean.

For my third recipe I decided to do Johnny cakes, which are popular all over the Caribbean and which I've passed up until now because they just seemed a little too much like the cornbread recipe I always do with chili. The Bahamians do Johnny cakes a little differently, though (without cornmeal) so I decided that it was a good time to try them. Here are the ingredients:

Johnny Cakes 
(from The Bahamas Islands

  • 3 cups flour
  • 1 tbsp baking powder
  • 1 tsp salt
  • 1/4 cup sugar
  • 1/2 cup shortening
  • 2/3 cup whole milk

And I also decided to do a dessert, which really, I don't know what I was thinking. What happened to my resolve to lose another 20 pounds this year? Oh I know, it weakened in the face of a Bahama Mama carrot cake (from The Bahamas Islands):

For the cake:
  • 2 cups sugar
  • 1 1/2 cup oil
  • 3 eggs
  • 2 cups flour
  • 1 tsp baking soda
  • 2 tbsp cinnamon
  • 1/4 tsp ground cloves
  • 1/4 tsp allspice
  • 1/4 tsp nutmeg
  • 1/4 tsp cardamom
  • 1 tsp salt
  • 2 cups grated carrots
  • 1 cup crushed pineapple, drained
  • 2 tsp vanilla extract
  • 1/2 cup walnuts, chopped
  • 1/2 cup shredded coconut
  • 1/2 cup raisins
For the frosting:
  • 1 8-oz package of cream cheese, softened
  • 1/4 cup butter, softened
  • 1 cup powdered sugar, sifted
  • 1/2 tsp vanilla extract
Note: I couldn't find a Bahama Mama carrot cake recipe that included a frosting recipe, though one did suggest using a cream cheese frosting. The above frosting recipe is just a generic version I found on one of the big recipe sites.


So I had all these plans made and was ready to go, then Martin said, "If it's the Bahamas don't we need rum?" Well OK, I guess a cocktail would go down pretty well with all that. Here's the one I picked:

Banana Orange Daiquiri
(from The Bahamas Islands

  • 1 1/2 cups sliced banana
  • 1/2 cup light rum
  • 1/2 cup sweet and sour cocktail mix
  • 1/4 cup concentrated orange juice
  • 30 ice cubes
Yeah, a little frou-frou I know. But it does contain the required rum.

My kids were home all day Monday, which meant I had all morning and most of the afternoon to pursue this little venture. I started with the carrot cake, since it needed to bake and then cool completely before it could be frosted. As cakes go, this one is pretty easy:

First mix the sugar with the oil and eggs. You'll end up with a big schloopy mess like this one:

This is just eggs, oil and sugar.


Next, add the dry ingredients and mix well. Fold in the carrots, walnuts, coconut, pineapple, raisins and vanilla extract.

Yum. Don't you just love cake batter?


Pour the batter into a greased 13x9 inch pan. Bake at 350 degrees for one hour.

Here's where I ran into a bit of trouble: my hour was up just as I was supposed to be leaving the house to take Dylan to his Kung Fu class. I opened up the oven and discovered that my cake was still jiggly in the middle. Dang. I set the shut-off time for another 20 minutes and then hoped for the best. Fortunately, when I got home the cake was just a little crispy around the edges but solid in the middle, so it worked out OK.

Mine was a bit too dark around the edges, but it didn't affect the cake experience at all.


Let the cake cool completely, then make the frosting:

Cream the butter with the cream cheese, then gradually add the sugar and vanilla. Try not to eat it all before you have a chance to get it on the cake. Now just slather it on the top of the cake and put it on a high shelf in the fridge, far, far, far out of the reach of your children. And husband.

Damn you, and your deliciousness.


I did the Johnny cakes next. They are better served warm, but as always I didn't think I was going to have time to bring it all together at the same time so I did mine in advance. The recipe is kind of weird and I had a hard time believing it was going to come out OK. Here's how it's done:

Mix all the dry ingredients together, then cut in the shortening. Work the mixture with your hands until the grains are about the size of rice. Then add milk until you get a soft dough (I had to use a bit more than the recipe called for).

Turn out onto a floured surface and knead until smooth. I did not actually use my bread machine for this. I know you are shocked.

This is a lot like a pastry dough.


Let the dough rest for 10 minutes, then transfer it to a greased 9x9 inch pan. You will have to press it down so it fills in all the corners. Poke the top of the dough a few times with a fork.

Now put it in the oven and bake at 350 degrees for 20 to 25 minutes. You can tell it's done when it starts to turn a little golden around the edges.

Johnny cakes taste a little bit like a traditional English scone.


The next thing I did was prepare the crab. I started by chasing my kids around the house waving dead crab bodies at them. This was a lot more fun than actually cracking the crabs, which is what I had to do next. I'm really bad at cracking crabs. I can never get all the shell out of the meat.

I chased my kids around with these. Hahaha.


After you're done cracking the crabs, you can use the shells to make stock, which is what I always do with crab shells since seafood stock isn't usually readily available in the market where I shop, and it comes in handy when making fish curries. In this case I also used it to make the crab 'n rice, which was a bit of a cheat since I couldn't find any recipes that called for anything other than water. But I just felt like it might be bland if I didn't use a stock to cook the rice, so I deviated. 

In case you're interested in making crab stock, here's how it's done:

Dump all the crab shell into a big stockpot and cover with water. Quarter an onion and drop it in the pot with about 10 whole peppercorns, a half cup of dry white wine, 3 or 4 sprigs of parsley, 1 teaspoon of salt and 2 tablespoons of tomato paste. Bring to a boil, then reduce heat and simmer for 30 minutes. Strain the stock through a piece of cheesecloth (I usually just use a fine-mesh strainer). Use it up in a day or two or you can freeze it to use later.

Crab stock is made with crab shell, onions, tomato paste, peppercorns, some parsley and a little white wine.


Next chop up the vegetables and fry them in the oil until they are soft. Stir in the tomato paste and seasonings, adding a little more oil if you need to. Saute for a few minutes until the flavors are incorporated.

Saute the onions and peppers.


Add three cups of water (I used non-traditional crab stock) and bring to a boil. Add the pigeon peas (Remember the pigeon peas from back in Anguilla? I still had half a bag left over, which was pretty convenient) and crab and let boil for five minutes or so.

(Note: I had to add liquid since the mixture seemed really dry before I'd even put the rice in it. I ended up using about twice as much as the recipe called for).

My mix was pretty dry, so I had to add extra liquid.


Add the rice, return to a boil, then reduce heat and cover. Let simmer until all the liquid has been absorbed (about 20 minutes).

While the crab 'n rice is cooking, you can work on the fritters. I did all the prep work in advance so I'd be serving the fritters just as the crab 'n rice was finishing. Here is the method for the fritters:

First pulverize the conch meat. I used my handy little food processor, which has pulverized many a meat including ham, lamb and kangaroo.

This is ground conch.


Now sift the flour over the bowl containing the ground conch meat. Stir until the flour coats all of the meat.

After you add the flour, the conch should look like this.


Gently fold in the chopped vegetables and the herbs, then add some water. The trick is you want just enough to bind it all together but not so much that the batter becomes runny. Here's what it ought to look like:

The batter should be pasty, but not too wet.


Heat up the oil in a stockpot. You want about two inches worth in the pan. It's ready when it bubbles up around the non-stirring end of a wooden spoon.

While the oil is heating, you can make the dipping sauce. Just whisk the three ingredients together in a small bowl.

Scoop up some of the fritter batter and flatten it out into the spoon. You kind of want them to be a little thin because you don't want to end up with fritters that are burned on the outside and raw in the middle. These aren't sushi fritters.

Heap the batter onto a spoon--you'll probably want it a little flatter than pictured here.


Now drop them into the oil. Flip them once during cooking so they will cook evenly.

There's something really satisfying about watching food in a deep fry.


When they are a nice golden color on both sides take them out and drain them on a paper towel.

Finished fritters. Mine were slightly overdone, but still really tasty.


Serve hot with the dipping sauce. Don't forget to serve the dipping sauce or you'll be annoyed when you see it sitting forgotten on the counter top next to the cooking oil.

The fritters work pretty well with the banana orange daiquiri if you can manage to squeeze it in between all the other things you're doing. Fortunately it's pretty simple:

Put the banana slices, the rum, sweet and sour mix and orange juice concentrate into a blender and pulse until smooth. Add the ice cubes one at a time until you get a nice slushy texture.

Frou frou, anyone?


A couple of notes about this recipe: I think it really needed more rum. I couldn't really tell I was drinking a cocktail. Also, this recipe is supposed to make six drinks. I halved it and barely got enough mix to fill two margarita glasses. So I think you could probably keep two people happy if you did the recipe in its entirety. With more rum.

The verdict--conch fritters: yum. Except that the meat was so mild, I couldn't even tell I was eating shellfish. Though very basic, the dipping sauce (when I remembered it) was actually a nice compliment though it further disguised the flavor of the conch. The crab 'n rice was also delicious--it was kind of earthy, which was quite different from most of the rice dishes I've done recently. Sadly, my lack of crab-cracking prowess kind of put Martin off the rice since he found a few bits of shell in his. Note to readers: Make sure you pick through your crab meat carefully. Or just buy it already cracked, which is what I'll probably do next time.

The cocktail was really good and I particularly enjoyed having it in the kitchen with me while I finished making the meal. Maybe I will have to do this every time I cook. (Hmm, a good idea or just the first step down a long, sad road?)

The Johnny cakes were probably the biggest surprise of the meal. They were tasty. I mean really, really tasty which was unexpected considering how simple the recipe was. I'm definitely putting these in my side dish rotation. I also think they would be great for breakfast, warmed up with a little honey and butter.

Finally the Bahama Mama carrot cake. Oh my god, yum. I had to ask Martin to get the leftovers the hell out of the house to share with his coworkers, which he forgot to do, which meant I ended up eating like five pieces of it, which meant my quest to lose another 20 pounds got shelved for another week. This was also the only part of the meal my kids really got to try. Hailey ate a slice then had a complete spaz attack because I wouldn't let her have seconds. This was quite possibly the best carrot cake I've ever had.

So yeah, it was like my billionth culinary trip to the Caribbean this year but one of the better ones, and definitely a lot of fun to prepare.

Next week: Bahrain.

For printable versions of this week's recipes:

Thursday, January 12, 2012

Recipes from Azerbaijan

Recipes from Azerbaijan
Hey guess what, I have officially cooked one meal from every nation on Earth ... that begins with the letter "A."

That's right, culminating with this entry I've now gone through all the "A" countries on my list, which took just about four months.

The nation that holds the proud distinction of "last of the A's" is Azerbaijan, which is a surprisingly medium-sized country (surprising because in my albeit limited knowledge of world geography I'd never actually heard of it) located between Western Europe and Eastern Asia. Azerbaijan was once a part of the Soviet Union, but regained its independence in 1991. Neighbors include Russia, Georgia, Armenia and Turkey.

Azerbaijan, located between Western Europe and Eastern Asia.


Azerbaijan is a Muslim country, but it keeps out of the chaos-loving international spotlight for the most part because it doesn't really partake in radicalism or government entrenched orthodoxy; in fact, Azerbaijan is a secular democratic nation, known for its progressive ideas and tolerance and support for secularism in general. It is also considered to be one of the most liberal Muslim-majority nations.

Food in Azerbaijan is, like food from most of Eastern Asia, full of color and flavor. It shares a lot of similarities with Armenian and Turkish cuisine, with dried fruits and nuts commonly appearing in dishes we tend to think of as being more savory.

Tandoori bread with "plov," Azerbaijan's national dish.


The "national dish" of Azerbaijan is "plov," which in Turkey is called "pilav," which of course is where we get our word for "pilaf." Azerbaijan has no less than 40 different versions of plov, most of which are cooked with some type of meat, dried fruit or both. Here is the recipe I chose:

Parcha-dosheme Plov (layered rice pilaf with dried fruits and chestnuts)
(from AZ Cookbook)
  • 3 cups long-grain white Basmati rice
  • 4 tbsp butter, melted
  • 1 cup peeled chestnuts
  • ½ cup pitted dried apricots, halved
  • 1 cup barberries
  • ½ cup pitted dates
  • ½ cup golden raisins
  • 1 ½ lbs skinless, boneless chicken cut into 2-inch cubes
  • 1 medium onion, peeled, cut in half lengthways, then thinly sliced in half-circles
  • 1/3 tsp ground saffrod threads, dissolved in 3 tbsp hot water
  • salt
  • ground black pepper
(Barberries, by the way, can't usually be found in the big grocers. You can get them at Asian markets or, like I did, from eFoodDepot.com, which has $5.99 shipping and is therefore my new favorite place to order exotic ingredients).

Barberries are kind of like really tiny cranberries.


This recipe comes from Feride, who blogs at AZCookbook.com. I love finding these sorts of blogs, and I wish every nation had someone as enthusiastic as Feride posting authentic recipes for hapless Googlers like me. I feel like my entries are more reliably authentic when I can use recipes that come from people who live or have lived in the countries I write about.

So my second recipe also came from Feride. Here it is:

Tendir Choreyi (Tandoori Bread)
(from AZ Cookbook)
  • 2 1/4 tsp dry active yeast
  • 1 ½ cups warm water
  • 1 tsp salt
  • 3 cups bread flour, plus extra for kneading
  • 1 egg yolk, for brushing
  • 1 tsp poppy seeds
Now what to serve with these recipes? Well, I learned from Feride after I'd already been to the store that plov is typically served with a salad made from cucumbers, tomatoes and peppers, or with pickled vegetables. But since I live 25 minutes and four obnoxious children away from our local grocery store, I elected not to go back and pick up the salad ingredients. Instead I went with my earlier tentative plan, which was to do the plov with the tandoori bread, and serve an appetizer instead. The appetizer recipe I chose came from News.Az, an English language news and politics website devoted to Azerbaijani issues, which also happens to have a pretty extensive recipes section. Here it is:


Kelem dolmasi
(from News.az)
  • 20 oz minced lamb
  • 1 large cabbage
  • 8 oz onion
  • Salt & pepper
  • 1/2 tsp turmeric
  • 1/2 tsp cinnamon
  • 2 tbsp chopped fresh cilantro
  • 2 tbsp chopped fresh dill
  • 2 oz short-grain rice
  • 2 oz chickpeas
  • 3 oz lamb fat
  • 1 tbsp tomato paste
  • 3 tbsp water
So I thought by stopping at three recipes I would have an easier time of it than I did with Australia and Austria, both of which had a whopping five recipes in their entries. Sadly, this was not the case. Azerbaijani cuisine is really not difficult to make, but it is time consuming, reminding me of the five hours I once spent in the kitchen trying to put an authentic Mexican meal on the table.

I started late Tuesday morning by making the filling for the Kelem dolmasi, more simply called "dolma." But if I had it to do over I would start with the bread, because although bread is always nicer when it is just out of the oven it can be prepared in advance and reheated.

First a quick note about tandoori bread (or tandoori anything, really). The name comes from the clay oven, or "tandoor" that it is traditionally cooked in, and you will never be able to duplicate the flavor of any tandoori recipe without one of those ovens, no matter how hard you try. Now, a tandoor oven is actually a part of my dream kitchen (I love naan bread and tandoori chicken) but I don't have one in my current kitchen, so this bread just goes in a plain oven, which makes it not very authentic. However, this is how an Azerbaijani stranded in the US would make a tandoori bread, so I guess I don't feel too bad about including it in my meal.

The ingredients for this bread are roughly similar to the ingredients for a basic french bread, but the shape is different and it is topped with poppy seeds which actually makes it quite beautiful in appearance. In fact this bread is quite possibly the most beautiful thing I've ever baked (my cakes certainly don't fall into that category).

So as always I used my bread machine, but this time I didn't proof the yeast first. I just put it in the little yeast dispenser at the top of my machine, then added the water, flour and salt to the bucket. I put it on the dough cycle and then went and picked my kids up from school.

This bread uses very basic ingredients, including bread flour and salt.


If you want to do it the old-fashioned way:

Mix the yeast with the water and let stand for a few minutes. Then sift the flour with the salt into a large bowl. Gradually add the water and yeast and mix with your hand until the dough forms a ball.

Turn out onto a lightly floured surface. Knead the dough for 8 to 10 minutes, or until it is smooth. Put it in a large bowl and cover, then let it rise in a warm spot until doubled (this typically takes 1 to 1 1/2 hours).

The dough after it has risen.


Punch down and turn out onto a lightly floured surface. Stretch the dough until it is an oblong shape, then with a rolling pin roll it until it is about 1/2 inch thick. Transfer to a greased or non-stick baking sheet and let stand for another 15 minutes.

After stretching and rolling, your dough should be roughly this shape.


Cut crosshatches in the top of the dough, about four in either direction. Brush with the beaten egg yolk (I mixed mine with a little bit of water to make it easier to work with) and sprinkle with poppy seeds.

Crosshatches, egg wash and poppy seeds give this bread its distinctive look.


Bake in a preheated oven at about 400 degrees for 20 to 25 minutes, until golden on top.

Isn't it pretty? Yummy too!


Now on to the kelem dolmasi. Here's how it's done:

First boil the rice for eight minutes. Meanwhile, peel and finely chop the onion. Then chop the herbs.

The recipe didn't really say what to do with the chickpeas (also known of course as garbanzo beans), beyond soaking them overnight and rinsing them. I used canned chickpeas, since I've never actually seen them dried. I decided to chop/mash them slightly so they would better incorporate into the filling.

Chickpeas (or garbanzo beans) roughly chopped


Now mince the lamb (I used my mini food processor). Here's where I ran into another problem: what to do with the lamb fat this recipe calls for? Mince it? Melt it? Does lamb fat even melt? I decided to mince mine. Thankfully, my husband doesn't actually read this blog because he'd be horrified if he knew I put fat in the dolma on purpose.

Minced lamb and its good friend, minced fat. Ew.


The ingredients for the dolma stuffing include onion, cilantro, chickpeas and turmeric.


Anyway, now get your hands into all that slimy raw meat and mix in the onion, spices, chickpeas, rice, chopped herbs and fat. Add a little salt and pepper for good measure. In fact, based on my results I would say to err on the side of a little extra salt and pepper.

Mix well with your hands until the stuffing looks something like this.


Fill the biggest saucepan you own with salted water and bring it to a boil over high heat. Now pull the outer leaves off of the cabbage (save them) and drop the rest of it, whole, into the water. Let it boil for three or four minutes, turning it if the water level isn't quite high enough to completely cover it.

The reason you are doing this is because it's difficult to get whole cabbage leaves off of an American cabbage. The cabbages you typically buy in our supermarkets come in very tight round balls, and because the leaves are crispy they will snap and crack when you try to pull them off in an un-blanched state. Blanching them for a few minutes makes it so they will come right off without tearing.

Now carefully take the cabbage out of the water (but keep the water boiling) and let it cool for a minute or two so you don't burn your fingers. Carefully pull the leaves off the cabbage, cutting them at the base if you have to do so to loosen them. Try to get them off in one piece. If the inner leaves are still crispy, return the cabbage to the boiling water for another three or four minutes. Repeat until all of the useable leaves are free.

Blanched cabbage leaves


Now put the leaves on a cutting board and cut out the tough stalks (save them). Cut the largest leaves in half.
Remove the tough inner stalk and set aside. Cut larger leaves in two.

Put a heaping tablespoon of the filling in the middle of each leaf, making a short cylinder shape. Fold the ends over the filling, then roll tightly (as if you are making a tiny burrito).

This is not much of a cylinder, but you get the idea.

Fold the edges over ...


Then roll, as if you were making a really small burrito.


Your finished dolma should look kind of like this, only without the hole in the middle.


Put all of the discarded cabbage leaves, stalks etc. into the bottom of a stockpot. I know, this seems a little strange. What you're basically going to be doing is steaming the dolma, with the discarded cabbage pieces forming the base of your steamer. Carefully place the dolma on the bed of cabbage leaves.

These dolma are resting on top of discarded cabbage leaves.


Add water to the stockpot up to about the top of the discarded leaves. Don't cover the dolma.

Now here's where you have to get a bit creative. The dolma needs to be weighted down so it doesn't unwrap during cooking. I used a metal pie pan, and then I put my mortar on top of it. You could also use a dessert plate with something heavy on top of it, but it would need to be an oven-safe one.

The dolma need to be weighted down during cooking so they don't unwrap. Just improvise.


Bring the water to a boil, then simmer for 25 minutes.You might have to use your ears to figure out if the water is actually boiling; I personally couldn't see what was in my pot after I weighted it down.

Meanwhile, make a simple tomato sauce out of the tomato paste and water. Heat it up for a few minutes over a medium flame. After the dolma have been cooking for 25 minutes, pour the sauce over them and cook for another five minutes.

The finished dolma, ready to eat. Mine were a little bland and could have used a dipping sauce.


While you're doing all this, you should also be making the plov. Because it takes a long time. A long, long time.

Here's how it's done:

Rinse the rice in lukewarm water until the water runs clear. Now personally, I never do this, which is probably why my rice is always a little sticky. But for this recipe rinsing is important because it removes the starch and gives the rice the right texture (it should come out fluffy with each grain separate).

Now fill a large bowl with lukewarm water and a tablespoon of salt and add the rice. Soak for 15 minutes or so.

Melt 2 tablespoons of butter over medium heat. Add the peeled chestnuts and stir-fry for 3 minutes.

Saute the chestnuts for no more than three minutes, stirring constantly.


How do you peel chestnuts? With much frustration and annoyance, because you had no idea what an ordeal and a time suck it is to peel chestnuts, and you wish that the other Safeway had also been sold out of them for the year like the main Safeway and Savemart were, because then you would have just had to use the walnuts you bought at Savemart and you would have saved yourself the trouble of peeling the damned things, most of which weren't any good anyway because in January chestnuts are pretty much out of season and any of the ones that are left over are mostly going to be dried out or rotten or just a bad texture, thus adding to your frustration and annoyance because you're spending all of your time doing this and it's already 6:30 and the kids still haven't had their dinner.

What? Sorry, I blacked out there for a second.

Peeling the chestnuts. What a horrible memory.


Anyway, to peel chestnuts cut a slit across the middle of each one, then boil them for about 20 minutes. Let them cool, then peel back the outer and inner shell to remove the light-brown nut that is inside. Simple, huh?

After the chestnuts have been stir-fried for three minutes, add the apricots, barberries and dates. Keep cooking for another three minutes. Lastly add the golden raisins and stir fry for one more minute. Don't leave the fruit and nuts unattended or you will burn them (like I did). Remove from heat.

Apricots, dates, and barberries.


Break out that huge stockpot again and put 10 cups of salted water into it. Or just fill it up almost to the top if it's not that big. Drain the rice (but don't rinse) and add it to the water. Boil for 7 to 10 minutes. You can tell when the rice is done because it will rise to the top of the pot. Don't overcook! The rice should be just a tiny bit chewy, not too soft. Bite a piece to make sure. Drain it in a colander and set aside.

Now in that large stockpot, melt a tablespoon of butter over medium heat. Put the uncooked chicken cubes in the bottom of the pot, distributing evenly. Add about a half teaspoon of salt and some pepper. Cover the chicken with the sliced onions and simmer for three minutes or so.

Now cover the chicken and onions with half of the rice. Spread the fruit and nut mixture out on top and then put the rest of the rice on top of that. Pour a tablespoon of melted butter on top.

Under this rice is a layer of fruit and nuts, another layer of rice, some onions and some chicken.

Now here's where things get a little weird. This is by far the most unusual cooking technique I've ever personally tried.

First let me just say that cooking plov is an act of faith, which means you kind of have to blindly trust that this technique is going to work. After reading the instructions I was really personally skeptical.

Put a clean dishtowel or two layers of paper towel over the pot. Be very careful to fold up the corners or otherwise make certain that the dishtowel or paper towel is nowhere near the flame. I really really don't want you to burn down your kitchen.

Put the towel/paper towel over the rice and fold up the edges. Top with the lid.

Put the stockpot lid on top of the towel. The towel will help absorb the steam from cooking, which I'm supposing is what prevents burning. I really, really expected that this dish would be burned, because the next step is to let it cook like that for 30 minutes, without stirring or disturbing it in any way. And then the step after that is to pour saffron water over it and cook it for another 30 minutes. I used the lowest heat setting on my stove, which is kind of a cheap crappy stove that cooks way too hot and kind of unevenly.

Making saffron water. Ideally you would actually crush the threads first.

To make the saffron water, combine the crushed saffron threads with three tablespoons of hot water. Stir until the water turns a deep orange. Note: have you ever tried to buy saffron? It is ridiculously expensive. A standard sized spice jar costs about fifteen bucks. But if you look closely at that spice jar, you will see that what you're actually buying is a tiny envelope with a pathetically small number of saffron threads in it, deceptively stuffed into a standard sized spice jar in order to provide the appearance of a much larger quantity. I got my saffron from the aforementioned eFoodDepot.com, which sent me a comparatively generous portion for around eight bucks. But if you don't want to spend the money, you could probably get away with substituting turmeric.

Pour the saffron water over the top of the plov about 30 minutes into the cooking process.

If you're worried about what is happening to your plov during this long hour, you can listen to the pot. If you hear it crackling, it's burning. If you don't hear any suspicious sounds, you should be OK.

When the plov is done, it should look like this:

1. Fluffy rice with separate grains.
2. The meat should have a golden crust on the bottom.
3. The onion should be translucent (almost invisible).

Scoop it all out of the pot and arrange it on a big platter. It's ready to serve.

Now by the time I actually got through all of this the kids were in bed. I had to give up on the idea of letting them share in the meal because it took a lot longer than I thought it would to finish. Of course they wouldn't have really eaten the plov anyway, and they most definitely wouldn't have eaten the dolma. They would, however, have devoured most of the tandoori bread, which would have left less for me. So it was just as well that they were in bed I guess.

The dolma was a little disappointing, especially after all that work. Martin and I both thought it was kind of bland. With a dipping sauce, though, I think it could have been rescued. In fairness, I suspect that the blandness of the dish was more in my failure to use enough salt than it was in any downfall of that particular recipe.

Shockingly, even after all of my skepticism the plov turned out perfectly, with the possible exception of a few burned chestnuts. The chicken was just as it was supposed to be, with a golden crust on the bottom that tasted really wonderful. The rice was an amazing texture, perfectly fluffy and separate just like it was supposed to be. I've never had rice turn out that well.

The bread was awesome. It was a beautiful color and the texture was perfect. After my last two bread failures it was great to finally get one right.

I think both the plov and the bread are going to go in my rotation for meals served to friends or on special occasions. The plov was way too labor intensive for every day, but way too delicious not to make again.

Next week: The Bahamas. The Caribbean again. Yay.


Copyright 2023 Becki Robins and Palfrey Media.. Powered by Blogger.

Blog Flux

Blog Directory