I'm pretty sure that the weather has something to do with how much I enjoy blog meals. Caribbean food, for example, really is better on a hot day. And Eastern European food is better on cold days.
Sadly, it was nowhere near a cold day when I did my Latvian meal. We still haven't had any really cold days here in California, but it was most definitely not cold a few weeks ago when I did this meal. I actually am starting to wonder if alphabetical was the way to go with this endeavor, or if I maybe should have done this geographically.
Latvia would definitely be a February meal, or maybe early March. It's in the Baltic region of Northern Europe, bordered by fellow cold nations Estonia, Lithuania, Russia and Belarus. In July, it reaches scorchingly hot temperatures in excess of 67 degrees. In February it drops all the way down to 16 degrees. My husband would probably love living there.
 |
| Cēsis Castle, Latvia. Photo by Graham.
|
Latvia is another one of those nations that got swallowed up by the Soviet Union and then spat back out again after the empire dissolved in the early 90s. During World War II it was also invaded and occupied by Nazi Germany, which is an interesting factoid because it's not something you really hear discussed when people talk about World War II. Through all of it, Latvia maintained its uniquely Latvian culture and language, and today it's actually a prosperous little nation, though it is still cold.
Anyway it makes complete sense that when you live in a freezing cold environment, you eat a lot of rich foods. That's what helps you achieve a layer of insulation to protect you from the elements, right? There's a lot of fat in Latvian food (and not a lot of spices), and typical menu items include potatoes, pork, eggs and cabbage. Here are the recipes I chose:
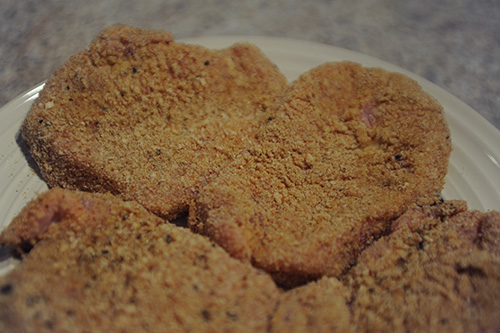
Breaded Pork Chops
(from
Latvian Stuff)
- 6 pork chops
- 3 tbsp light cream
- 1 egg
- 3/4 cup bread crumbs
- Butter and oil
- Salt and pepper
- Flour
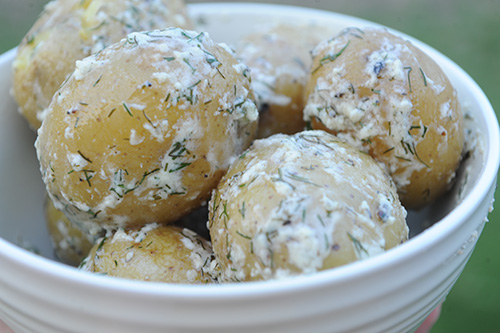
Kartupeli ar Dillēm (Boiled Potatoes With Dill)
(from
Saveur)
- 2 lb small Yukon Gold potatoes, unpeeled
- 1/3 cup sour cream
- 6 tbsp fresh dill, minced
- 4 tbsp unsalted butter
- Salt and freshly ground black pepper to taste
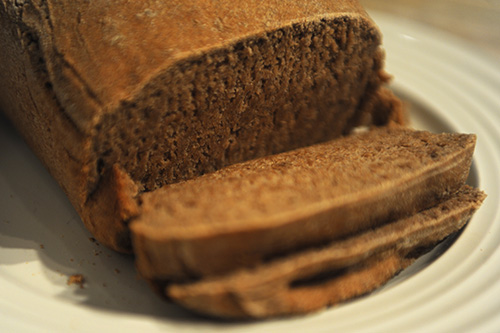
Latvian Rye Bread
(from
The Rīgas Stradiņa Universitāte)
For the starter:
- 3 tbsp coarse rye flour
- 1/2 cup buttermilk, at room temperature
- 1 1/4 tsp sugar
For the bread:
- 5 cups coarse rye flour, sifted
- 2 1/2 cups water
- Pinch of salt
- Caraway seeds to taste
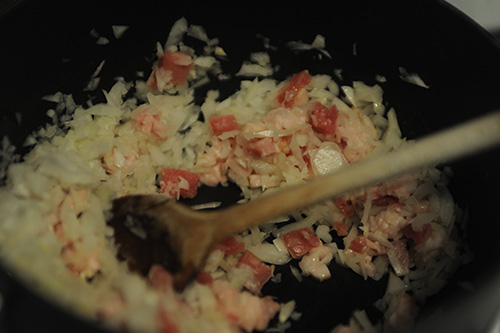
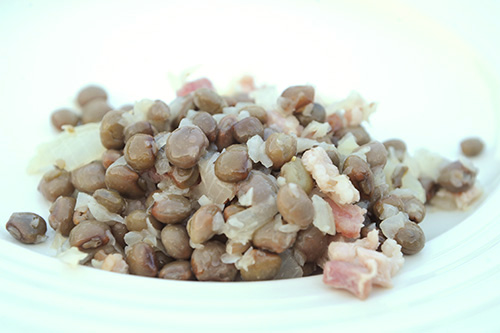
Grey peas with bacon (Pelēkie zirņi ar speķīti)
(from
Cooking Latvia)
- 7 oz pigeon peas
- 4 strips smoked bacon
- 1 small onion
- Salt
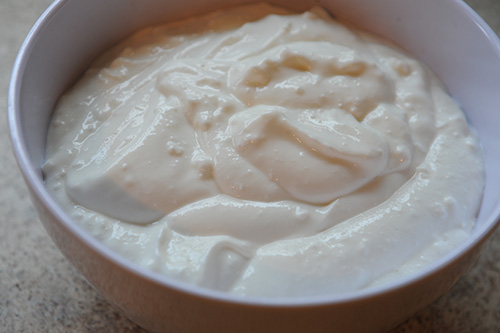
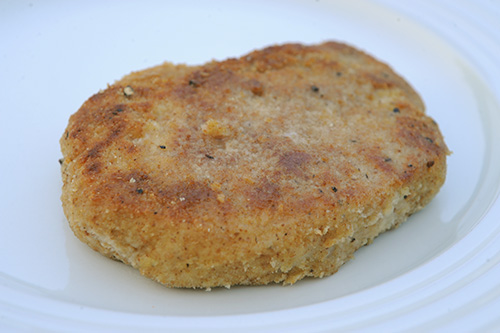
Jåñi Cheese
(also from
The Rīgas Stradiņa Universitāte)
- 2lb, 3oz skim milk dry cottage cheese*
- 169 oz whole milk (avoid ultra-pasteurized)
- 3 1/2 oz sour cream
- 2 eggs
- Salt
- Caraway seeds
- 3 1/2 oz butter, melted
* I bought milk that wasn't ultra-pasteurized, which is something you need to make cheese. But I think the cottage cheese needed to not be ultra-pasteurized, too.
Yes, this was a lot. Let me just start by cautioning you against ever trying to make cheese and bread on the same day. It's really quite a stupid move.
First we're going to make the bread, because that takes days. Literally. You need between 28 and 36 1/2 hours to make this bread.
First
you have to make the starter, which you do a day and a half before baking. Now, I
never have any luck with this sort of thing. I've tried a couple of
times to make sour dough starter and had no success whatsoever. So I did
not have high hopes for this, either.
What you're
supposed to do is add the 3 tbsp flour to the buttermilk, then add the
sugar and cover. Let ferment in a warm place for eight to 12 hours. I'm
assuming that when you're done, it should be frothy. Of course, mine
wasn't.
Now heat up the water and add 1/4 cup of flour. The water should be
almost (but not quite) boiling. You're trying to form a medium-thick
porridge, so keep gradually adding flour until you get the right
consistency. Now add the starter and mix well. Cover and let ferment in a
warm place for another 8 to 9 hours, or until the mixture gets sour.
Now
you need to make a leaven. To do this, mix a third of the flour with
hot water and mix with a wooden spoon until smooth. Let cool to about 95
to 105 degrees, then add the starter. Mix until smooth.
Sprinkle some flour over the the dough and let rise in a warm place for 10 to 12 hours. Now start kneading, adding flour, until you have a nice elastic dough. It should be firm and not sticky. Cover and let rise in a warm place for 1 to 1 1/2 hours, or until it increases in volume by 1/3 or 1/2.
Transfer to a loaf pan and bake at 350 degrees for 1 to 2 hours. The bread is ready when you knock on it and it sounds hollow.
Because my starter never got frothy, I added a small amount of yeast to mine. Cheating!
Now for the cheese. First put the cottage cheese in a food processor and grind it up. Now, this is supposed to be a dry cottage cheese, which is hard to find in the US. So I just tried to drain off some of the liquid after I ground it up.
Now heat your milk until it gets to 194 to 203 degrees. If you've ever made cheese before, you know how important it is to get this right because the temperature of milk affects what kind of cheese you end up with. Pull up a stool and sit there with your wooden spoon, and stir and stir and stir. It will take a long time. When it finally reaches the right temperature, add the cottage cheese to the milk. Keep heating until the temperature reaches somewhere between 185 and 194 degrees.
So now you should start to get a clear whey separating to the top. This did not happen for me, and I think it was because the cottage cheese I used was flash pasteurized, though I could be completely wrong. At any rate, the cottage cheese alone was not enough to convince the mixture to separate, so I ended up adding a little bit of vinegar. That did the trick, but I don't know how much it ended up changing the final product.
Once you have a good separation, poor off the liquid and transfer the solids into a clean, damp piece of cheesecloth. Hold the corners together and roll the cheese back and forth across a wooden surface to remove any excess moisture.
Now place the cheese in a bowl and, using a wooden spoon, mix with the sour cream, eggs, salt and caraway seeds. Return to a pan with the melted butter and cook over low heat for 10 to 15 minutes, or until melted and shiny (the temperature should be about 167 to 176 degrees). The higher the temperature and the longer the heating time, the harder your cheese will be.
Now transfer the cheese back to a damp cloth. Tie the corners of the cloth together and place under a weight in the fridge. The cheese is ready to slice when it has cooled.
Now for the easy stuff, starting with the peas. If you're using dried peas, cover them with water the day before (sometime during the process of making the bread). Then add salt and cook the peas until soft. I used canned peas so I skipped this step.
Now fry the bacon and add the onions. Cook until soft. Add the peas to the pan and fry for a few seconds. That's it. I know, simple compared to those last two recipes.
OK, the potatoes. Are you tired yet? First bring 8 quarts of salted water to a boil. Add the potatoes and cook until they can be easily pierced with a fork (about 12 to 15 minutes) Meanwhile, mix the sour cream with the dill, butter, salt and pepper.
Drain the potatoes and remove the pot from the stove. When the potatoes have drained, return them to the pot with the sour cream mixture. Cover the pot and give it a good shake. Transfer to a bowl and add salt and pepper, if needed.
Finally, the pork chops. Start by beating the egg together with the cream. Then mix the bread crumbs with the salt and pepper. Take a meat mallet and tenderize the pork chops on both sides until about a quarter inch thick. Now dip in in the egg mixture, then in the bread crumbs.
Heat some oil in a frying pan over a medium flame. Fry on one side, then add a tablespoon of butter and flip. When both sides are golden, the chops are done.
So this was very good meal. It would have been more delicious if it was cold outside, because it was very heavy, what with all the pork and the bacon and the stodgy bread. I did like the bread but I think the failure of the starter impacted it--it was quite heavy and didn't really rise completely. The cheese, well, hmm. I don't know what it was supposed to be like so I can't really comment on whether I got it right. It was very soft, like a queso fresco. It also had those caraway seeds, which I don't love. It tasted OK with the bread but I don't think either of them were really worth all of the effort.
Loved the pork chops and potatoes, and of course the pigeon peas because I like pigeon peas in almost any form. And you can't really go wrong with bacon, can you?
It was a very challenging meal and I'm glad I tackled it. I might not be attempting cheese again for a while, though, and I almost certainly won't ever be attempting any home made starter again. But those pork chops and potatoes, give me a nice February evening and I'll do that one again.
Next week: Lazio, Italy